WordPress is hands down the best platform to build websites easily and at quite an affordable price. However, if you don’t optimize it correctly, your website’s loading time will be quite slow.
Unfortunately, if your website takes too much time to load, it results in increased bounce rates and declined conversion rates. Consequently, you will lose a large number of potential subscribers and customers.
Are you looking for some sure shot tips to boost the speed of your WordPress website?
In this comprehensive guide, I’ll cover all of the advanced steps that will consistently speed up a WordPress site.
Why The WordPress Site Speed Matters?
In July 2018, Google announced its new speed algorithms called “Speed Update.” The update affects the slow loading websites by pushing them down the mobile and desktop search results page.
According to the StrangeLoop case study on Amazon, Google, and other significant sites, even a 1-second delay in the page loading can lead to a 7% loss in conversion. It also results in 11% fewer page views and a decrease of 16% in customer satisfaction.
To sum up, website owners now have only a maximum of 5 seconds to showcase the page content.
How to Speed Up The WordPress Site?
Below, I am going to list some advanced actionable steps to accelerate your WordPress speed immediately.
Note: These techniques are advanced, so if you are not familiar with technical aspects, you might need a WordPress developer to implement them.
Connect SSL Certificate Properly
Have you recently switched your WordPress site from HTTP to HTTPS? In other words, have you just installed an SSL certificate on your WordPress website? You might be noticing mixed content errors on your site if you did so.
Do you want to see whether your website has this error or not?
Navigate to Chrome browser » visit your site in the Chrome browser » Right-Click or Ctrl + Shift + I » Inspect Tool » Console.
SSL errors don’t affect the look of a website look, but it harms site speed and performance. You will definitely face mixed content errors on your website when you redirect your site from a non-SSL to the SSL version. These errors directly affect the speed and increase page load time.
The good news is that you can fix the error by installing the Really Simple SSL plugin. This plugin can be installed in a hassle-free way, and it will manage the SSL related issues on your WordPress site with a few clicks.
Optimize Image File Size for Better Performance
According to several UX researches, the right colors and visuals can increase user engagement by up to 80%. Also, users are more likely to read your content.
According to the HTTP Archive 2019 page weight report, after videos, images make up 34% of the total web page weight.
In simple words, non-optimized images will hurt your website performance instead of helping you.
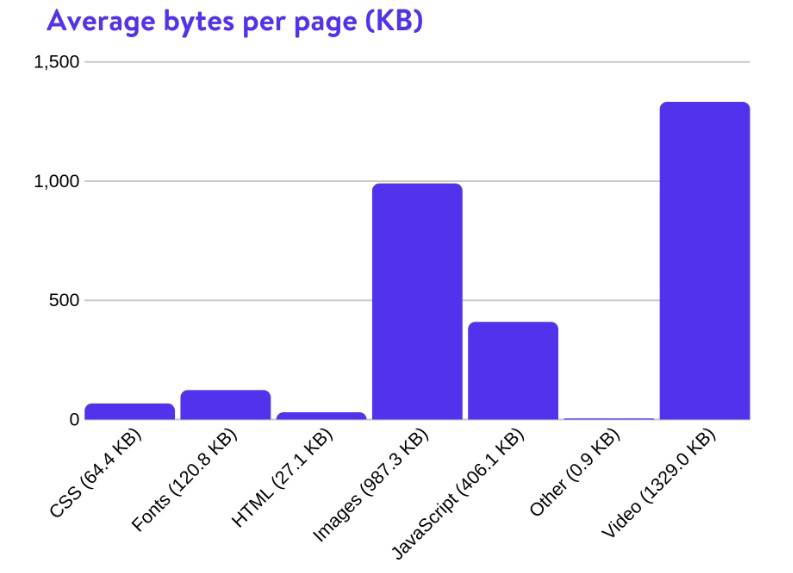
As evident from the graph above, image size optimization holds more importance than CSS, Fonts, HTML, and JavaScripts.
You can optimize images file size before and after upload to the WordPress site.
Before you upload an image on the website:
Use photoshop to reduce image size manually.
Use FREE online Image Optimizer like kraken.io to reduce image size. [This process is also a manual and time-consuming process]
After Uploading the Image on the Website
If you want to optimize images’ file size automatically after uploading on the WordPress site, you can use image optimizations plugin like:
I personally use the Imagify plugin to reduce image size. This plugin automatically optimizes images when you upload it on your website.
No matter which image optimization plugin do you use, almost all of them offer three types of options for image optimization, which are Normal, Aggressive, and Ultra.
I always recommend the Aggressive optimization option. The Aggressive optimization allows you to reduce the image file size by 80% to 90%, without losing the image quality.
Use Lazy Load Feature on Images
Do you use lots of images on your blog post?
If yes, then you must use a lazy load plugin in your WordPress site.
When multiple users visit the site, your site loads with all images and videos, as you already know, images and videos directly impact the website loading speed.
Instead of loading all the images on a blog post, the Lazy load plugin will load only those images that will display on the user’s screen.
Best Lazy Load Plugins
Use Expect Feature on Homepage and Archive page
WordPress displays the full content of articles on the homepage and archived pages like the Tag page, Category page, etc. As those pages show full content, therefore, they load too slowly, and it impacts the entire site speed.
One more disadvantage of this feature is that users get access to the full content without visiting the actual page. This harms the bounce rate and decreases page views significantly.
To avoid this, Navigate to your site admin panel. Dashboard » Setting » Reading » For each post in a feed, include: Choose “Summary” instead of “Full text.”
Limite your Post Revison
When you update your page and post in the WordPress, it has a built-in feature to store your page. It saves the pristine version of the post as a revision in the WordPress database.
This feature is a life-saving one if you accidentally lose the latest page and post data. You can easily restore your pristine post version from the post revisions storage.
However, revisions take a lot of space in your WordPress database. It can also slow down your WordPress site.
It is better to limit your post revision for the last few numbers. You can do it easily by adding a single line code to the wp-congfing.php file.
define( 'WP_POST_REVISIONS', 3 );
If you use the exact code as above, it will limit storing only the last three revisions for each page and post, and automatically degrade older revisions.
Disable Hotlinking and Leaching of Your Content
If you publish quality content with appealing images on your website, the chances are that it will be stolen sooner or later.
If someone has stolen your images and directly serve that image on their website, instead of uploading it on their web hosting server, unfortunately, those images load on your server and use your database bandwidth.
To make matters worse, you don’t get any traffic to show it!
To get rid of this issue, you need to disable the hotlinking from your WordPress site.
Simply add the Disable hotlinking code mentioned below in the .htaccess file of your site servers.
#disable hotlinking of images with forbidden or custom image option
RewriteEngine on RewriteCond %{HTTP_REFERER} !^$
RewriteCond %{HTTP_REFERER} !^http(s)?://(www\.)?example.com [NC]
RewriteCond %{HTTP_REFERER} !^http(s)?://(www\.)?google.com [NC]
RewriteRule \.(jpg|jpeg|png|gif)$ – [NC,F,L]
Note: Remember to replace your domain name with example.com.
Split a Long Post into Pages
Blog readers love to read well-researched and in-depth articles. One more startling benefit of a long-form post is that it ranks higher in the search engines.
However, if you publish a long in-depth post with lots of images and videos, it could hurt your loading time.
Instead of keeping a blog post long, you should break it into several pages.
WordPress has a built-in feature to do that. You just need to add a one-line code at the place where you intend to break the page.
<!––nextpage––>
Disable Pingbacks
Pingbacks look like comments, but that are merely worthless scripts made by WordPress to alert website owners to link mention of your blog posts.
It’s a great feature of WordPress. However, lots of third-party brand monitoring alerts tools like Google Alert also provide a similar service.
You need to disable Pingback to avoid unnecessary scripts that slow down page load. Another disadvantage of Pingback is that it can increase the chance of the DDoS attack.
Follow this step to turn off pingbacks: Dashboard » Setting » Discussion » Default post Settings: Uncheck “Allow link notifications from other blogs (pingbacks and trackbacks) on new posts.”
This setting disables pingbacks only on the next new post. If you already published a few posts on your site, then you need to turn it off on all the older posts.
Navigate to the: Dashboard » Post » Select all posts » Bulk Actions » Edit » Apply Bulk Editor » Pings: “Do not allow.”
Break Comments into Pages
Do you get lots of comments on your blog post? I must congratulate you; It is an indicator that your audience is loving your content.
On the contrary, I must warn you that all those comments affect your site speed. You can’t delete those comments, although you can manage it by splitting them into multiple pages.
WordPress has a solution for that. Just go to Dashboard » Setting » Discussion » Other Comment Settings: Unable the feature by checking the box ‘Break Comments into pages.’
Advanced Tip: Disallow comments in the robots.txt file to keep your search console clean.
Use CDN [Content Delivery Network]
It is quite sure that each user on your website comes from a different location. All of them will experience the loading speed of your website differently.
That is because of the location distance between your hosting servers and the users. The longer the distance, the more it will impact the site speed.
For example, Let’s assume your web hosting server is located in the USA. If you get users from the USA, the website will load much faster for them. However, it will obviously be slower for the users residing in the UK or India.
Simply put, the geographic location distance is the main culprit for speed issues. You can avoid this by using CDN (Content Delivery Network). It will load the website faster at any location all over the world.
CDN is a network of servers from all around the world. That server stores a static file of content like “images, CSS, JavaScript, and videos.”
When someone visits your website while you are using a CDN, they receive a static file of your content from the CDN server nearest to them.
A significant advantage of using CDN is that CDN takes bandwidth burden on their shoulder, so your web hosting will also be faster.
I use Cloudflare CDN and would highly recommend it. It works well with your WordPress website and is compatible with your existing WordPress cache plugin for better performance.
Conclusion
I hope this thorough guide will be useful to improve your WordPress site speed. Go ahead and try these tested techniques for better performance of your website.
I am sure you will be surprised to see how these steps instantly boost your site speed. Don’t forget to check your site speed before implementing each technique so that you know how much is the difference.
If you like this blog post on improving WordPress site speed, kindly share it with others to help them.